Happy Halloween, folks! In the spirit of Halloween, we will create our very own spooky Scratch greeting:
As you can see, this project involves programming scenes and their transitions. We will:
- change scenes with the broadcast and when I receive... blocks
- work with sounds
- use some randomness (with the bats)
- play with simple ghosting effects
- reuse scripts with broadcast and when I receive... blocks
The script for this project is longer compared to last week's. We will go through them step by step:
Step 1: Outline the scenes and program the Stage
To make the programming process clearer and easier to manage, we should always have some kind of outline of how the final product will look like. You could draw a story board for your own project if you like. In this project, we only want four main scenes:
- Scene 1: Lightning with thunder sound effects
- Scene 2: Witch flying with laughter
- Scene 3: Bats flying in the darkness. There will be lightning in the middle of this scene.
- Scene 4: Clock striking and followed by Happy Halloween greeting.
How shall we put these into a script? Let's look at it this way: suppose you are the director of a play. How would you organize and manage the stage, actors and props for all the scenes in your play? With a big play, it would be messy without a plan. One thing you could do is to group all the actors, props and stage decorations. You tell the audio guys that when you call out "Scene 1!", they should blast the sound of thunder and the lighting operator must flash the stage lights as lightning.
You then call out "Scene 2!" and actor playing the witch should start to "fly". The actor is strapped to a suspension manned by several stagehands. The stagehands manoeuvres the suspension so that the witch "flies" from one spot to another on stage. As all this is happening, you ask the audio operator to turn on the evil witch laughter.
Then you call out "Scene 3!", and the scene changes again. See what we are doing here?
Similarly to shouting "Scene 1!" as a play director, in Scratch we will broadcast a message to start a scene. We begin the lightning scene using the
broadcast...and wait block:
 |
| Call out a scene with the broadcast...and wait block |
How can we create a lightning and thunder scene in Sratch? We don't have lightning operators to man the lights for us in Scratch, but we can use the Stage backgrounds to help us. We will create two of them, one in solid black (which we name "darkness") and one with a white thunder strip across (which we name "lightning"). We also add a thunder sound clip that we want to play later:
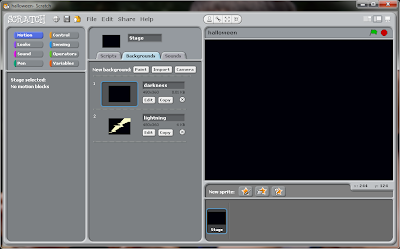 |
| Stage backgrounds |
 |
| Stage sound |
Note that creating the backgrounds and adding the sound clips does not do anything to the scene. We have just set up the props needed for scene, but we need to now tell the story. In other words, we need to say exactly how, when, where and which prop should appear. This the job of the script:
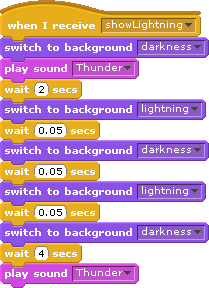 |
| Script on receiving "showLightning" |
Here, we start with having a "darkness" background and playing the thunder sound clip. Then we use the
wait for 2 secs block since we want to show the "darkness" background for a while before flashing the lightning. Note that we do this by alternating between backgrounds and using
wait for...secs to time the background changes.
If you run the Scratch program now, you would notice that the scene is not very long. We want a longer lightning scene, so we merely repeat it by broadcasting the "showLightning" message again:
 |
| Repeat a scene by broadcasting the same message again |
Run the program now to convince yourself that there is now a repeat of lightning and thunder. With that, Scene 1 is done. Now on to Scene 2!
Step 2: Set up and program the witch
We begin by broadcasting a mesage for the witch to appear:
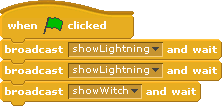 |
| Using the broadcast block to call up the witch scene |
Of course, we will need to add a witch sprite. We also need to add a laughter clip to it:
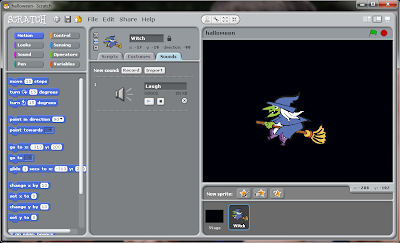 |
| Sound clip for the witch |
This is the script for the witch:
Look at the
when green flag clicked block stack. What we are doing here is to arrange the witch sprite at a certain position and orientation, and asking it to hide itself first since it should not appear at the very start of the program. If this were a play, it would be akin to telling the actor exactly where she should be at and how she should look when she is on stage. However, she should only go on stage when it is her turn i.e. when she hears "Scene 2!", or in this case, when the "showWitch" message is broadcasted.
The two other stacks contain instructions for the witch sprite when it receives the "showWitch" message. Let's look at the one on the right. This stack tells the sprite to show itself and fly around the stage using the
glide blocks. We wait for a second first before doing these, and the reason for that is because we want the audience to hear the witch laughter first. This is just to give the audience a sense of anticipation.
Now look at the stack on the left. This stack has instructions to control the witch's laughter and appearance. First we play the laughter clip twice. We then use the
repeat and
change ghost effect by... blocks to make the witch gradually disappear. For eerie-ness' sake we play the laughter yet again.
Run the scripts now. Notice that the witch flies around and laughs at thesame time. This is because both the
when I receive "showWitch" stacks run at the same time. We say that the stacks
run in parallel.
Step 3: Set up and program the bats
Alright! On now to the next scene: bats! Again, we begin with a new broadcast:
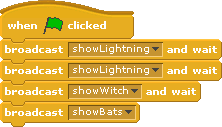 |
| Calling the next scene with a broadcast |
If you are wondering why we are not using the
broadcast...and wait block this time, hold that thought, I will explain it soon =)
We begin with one bat. We want the bat to fly by alternating between costumes, so we add two costumes to the bat sprite.
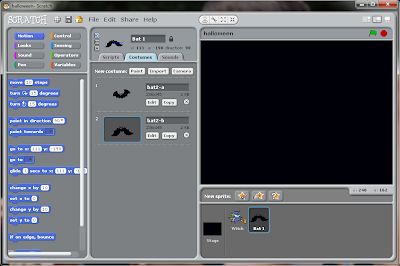 |
| Bat costumes |
We also want bat sounds, so we add that in too:
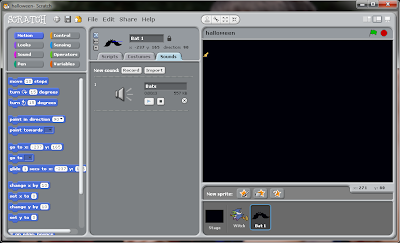 |
| Sound clip for the bat sprite |
Let's look at the script for the bat:
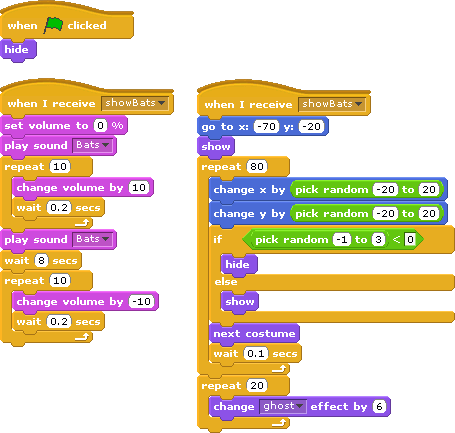 |
| Scripts for the bat |
Like the witch, we don't want the bat to appear at the very start so we ask it to hide when green flag is clicked. The next two stacks are instructions for the bat to follow when it receives the "showBats" broadcast message. The one on the left manipulates the sound clip. Basically, we want to:
- Gradually increase the volume of the clip (with these blocks: set volume to 0%, play sound Bats, and repeat 10. Each time it repeats we change the volume by 10. This is how we gradually increase the volume)
- Let it continue to play for a while (with the play sound Bats and wait 8 secs blocks) and then
- Decrease its volume until it is gone altogether (with the repeat block, only this time, we change the volume by -10)
The block on the right programs the behaviour of the bat. There are basically three main things going on here:
- Position the bat and show it.
- Animate the bat. The script for this is enclosed in the repeat 80 block. There are three things we do to animate the bat:
- First, we move it using the change x by... and change y by... blocks. We put random values between-20 and 20 for the change so that they appear to be flying a little haphazardly.
- Second, we want to make the bats blink. We do this by hiding the bat at random times. Our pitch black scene masks the disappearance of the entire bat. The audience will only notice the disappearance of the eyes, which gives the impression of them blinking. Note that we have used a simple trick by using the if (pick random -1 to 3) < 0 block as a condition to hide the bat. This means that there is a 1/4 chance that the bat will blink (i.e. hide), since there is a 1/4 chance that a random number appearing between -1 to 3 is less than 0.
- third, we make the bat flap its wings by changing its costume from one to the next. Although most of the time the audience won't see this, at the instance when the lightning flashes it will be visible. We will talk about showing the lightning later.
- Make the bat gradually fade, like what we have done to the witch.
If you run the scripts now you will see a pair of eyes moving about incomplete darkness. We want more bats. Let's add two more - we will just make two more copies of the first bat and name them Bat 2 and Bat 3. Do this by right-clicking the bat and selecting "duplicate". Now click on a bat copy. You will notice that it has the exact costumes, sound clip and scripts as the first bat. We don't really need to run the sound script in the bat copies, so we delete them. We also don't want the bat copies to appear at the same position as the first bat, so we enter different values in the
go to x...y... block.
So, the scripts for Bat 2 and Bat 3 are the same. They differ only in the values of the
go to x...y... block:

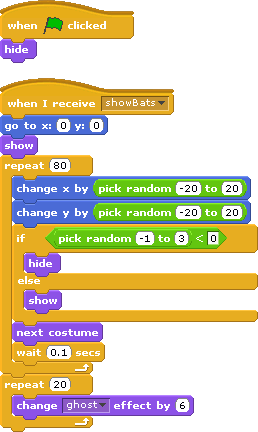 |
| Scripts for Bat 2 and Bat 3 are the same, with the exception of their starting positions |
When we run the scripts now we will see three bats in the darkness. That's not extremely spooky, so to make it more dramatic we add in lightning in the background. We could program the lightning in another
when I receive "showBats" stack, but we won't. Instead, we will
reuse the scene by broadcasting the "showLightning" message.
This is why we use the
broadcast "showBats" block instead of
broadcast "showBats" and wait - we want the bats and lightning scenes to run together. You can imagine this as the play director calling out "Bats!" followed immediately with "Lightning!" and all actors and stage hands involved in both scenes go about the job immediately. With this, we are done with Scene 3!
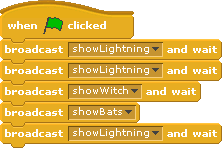 |
| Reusing lighting scene |
Step 4: Set up and program the "Happy Halloween" greeting
We could, as with the earlier scenes, add a broadcast block to the outline stack to call up this final scene (which we will call "theEnd"):
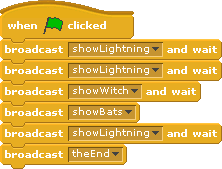 |
| We may call up the final scene this way |
However, let's not do that this time. Let's program this scene so that we can hear the striking of the clock as the bats from the previous scene are fading. To do this, we will slot the broadcast "theEnd" block in the script of a bat, just before the script that tells the bat to fade away:
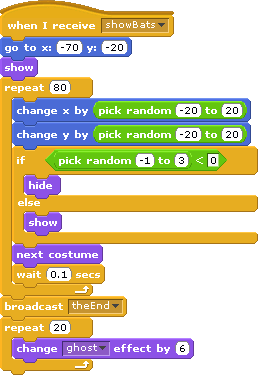 |
| Slotting broadcast "theEnd" just before repeat 20 in Bat 1 script |
We only need to broadcast the message from one bat, so there is no need to add the broadcast block to the other two bats.
Basically, we want this final scene play the sound of a striking clock and make the Happy Halloween greeting appear gradually. We create a sprite using text in the Paint Editor, and then proceed to add the clock sound clip to it:
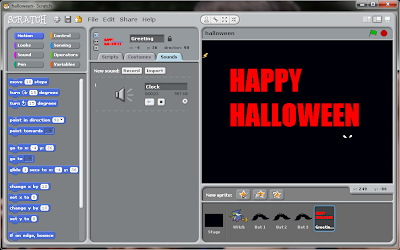 |
| Greeting sprite and accompanying sound clip |
Next, we program its behaviour:
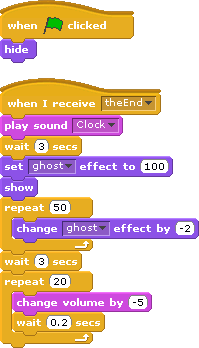 |
| Script for the Greeting sprite |
Like all other sprites, we hide it at the start. When the sprite receives the cue to appear, it will first play the sound clip and wait for a while. We set its ghost effect to 100, meaning that it begins as a transparent sprite. We repeatedly decrease the ghost effect value so that it eventually becomes zero. This is how we program it to gradually appear on scene.
The final
repeat 20 block turns down the volume of the sound clip, so that the sound gradually fades away and our little Scratch greeting program comes to close.
And that is the end.
Phew! That is a pretty long script for a short animation like that. The concepts are really not complicated. The script is long because there are a lot of setups and block manipulation involved to create the effects we wanted.
Our project next week will have a very short script - we will
interact with our program using the microphone. Look out for it! Til then! Happy Halloween!


